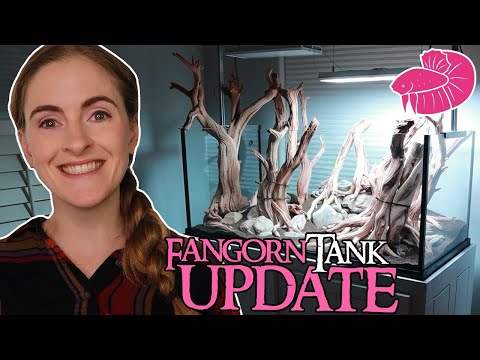
The Lord of the Rings Fangorn Forest Aquascape has progressed! Moving this thing inside and getting it ready for planting was a battle. what do you think of the plant selection I’ve chosen?
Also, that LIGHT. The background light panel is flippin’ cool, I can’t wait to see what it looks light against the aquascape when I’m finished with it. It is made by The Lightground (https://thelightground.eu/), I bought it over a year ago and have never opened it!
The tank and stand is by CUSTOM AQUARIUMS!
🡲 Youtube: https://www.youtube.com/c/CustomaquariumsDotCom
🡲 Website: https://www.customaquariums.com/
LINKS
LOTR-themed tanks playlist: https://youtube.com/playlist?list=PLu0BMgtnxGbGewL13gCb0XEplny3d-iZA
PREVIOUS video in the Fangorn Forest Series: https://youtu.be/t4bhAihWWG8
“Bag End” Hobbit Aquascape: https://youtu.be/PF0iOpUtDPM
Custom Sculpted Vivarium: https://youtu.be/8ik-EQ-F9tY
Planted Tank Substrate: https://flipaquatics.com/products/brightwell-aquarium-soil-black-rio-escuro
Mineral-rich Substrate layers: https://flipaquatics.com/products/brightwell-shrimp-plant-soil-clay-laterin-substrat?_pos=1&_sid=9b77aedd3&_ss=r
——————————
► My Website! http://www.simplybetta.com
► Patreon! https://www.patreon.com/simplybetta
► Instagram! @simplybettafish
► Discord! https://discord.gg/8E2TMeqb4s
► Tiktok! @simplybettafish
——————————
0:00 Intro and Tank
1:17 Preparing
3:25 Re-Assembling
7:34 Adhering Hardscape
9:47 LED Panel Light!
10:56 Trimming
12:42 PLANTS plan and reasons!
I made this awesome hardscape for my Lord of the Rings themed aquarium. I collected my wood from aquarium conventions. Totally worth the lengths I went through to bring it home. I got this beautiful, rimless tank from custom aquariums in which to display fangorn forest. This is the second in My Lord of the Rings themed planted tank aquascapes series Bag End was my first. This is the tank that started it all like five years ago.
By the way, if you want to know why I'm making a fangorn forest Lord of the Rings themed aquascape and what that even is. I explain thoroughly like two videos ago, the link is down below. I also go over how I did it and how I planned it and now the thought process behind making the hardscape. So go check that out. I might have put myself into a bunch of scenes from the movies too. Just saying I made myself a practice box or a dojo so I could practice the set up and now I get to do the hard part,.
Transferring this into my custom aquarium inside. Help me decide at the end of this video, by the way, I'll show you my plan and you can suggest plants. Please stick around. I probably should have done this before it got all nasty and cold and snowy outside. The reason why I didn't transfer my beautiful fangorn forest hardscape inside earlier is because I was waiting on an order of my planted tank substrate. I may not know what plants exactly yet that I'm putting into the fangorn.
Forest aqua scape, but I know that there's going to be a lot of plants and I need a very nice, high quality planted tank substrate to support those plants. I figured I would need at least this much of my nice planted tank substrate of which I use florinvolcanit by brightwell aquatics in this really nice, small, extra fine variety. I can't sit down in my house without being harassed by animals, but I love it. And what is this thing that I'm adding to the tank? You might ask. Well, you'll find out. It's really cool. Okay, I'll be transferring this into that.
I'll be taking some reference photos just in case I mess everything up. I really need to know how to put it back together. I really want the back of the tank upwards. It's a very common thing to do and always keeps. It looks very nice. This technique involves pantyhose. Don't be shy boys, about going to the store and buying yourself some pantyhose. Just say it's for your own personal use instead of just making a hill out of substrate.
I want to give my rocks and my sticks in the background something really solid underneath of the hill. So I'm going to fill up this pantyhose with some really lightweight, bulky material. I've used hydroton in the past, which are those little round expanded clay balls. This time I'll be recycling some media from an old terrarium of mine. You can also use gravel if you're not concerned about the weight. I just like the idea of using something lightweight. I'll just take this piece of hose and open it up and kind of stuff it for. So now I get this little sausage.
One of these by itself. Isn't exactly going to make a huge difference. But a bunch of them can make a substantial difference. I don't know why this is such a nervewracking idea for me to pick apart the thing I've so carefully planned and made to just remake it again because I'm afraid I'm going to fail. I just don't think about Taylor. Just go lift it up. I got this. Come back. I'll take my rocks.
Sitting there roughly I think the position they were in that. It's. I created my very first tree. Maybe I shouldn't be so nerve wracked after all. That wasn't so bad. There's still a zip tie. It's still not adhered together with glue like I usually do. And just wait until I get all the trees in in case I have to make some last minute adjustments.
I'll get it a little further along and then I'll start gluing and adhering. I feel like I have to work on this high background area. Next, take a picture. This one. This one. Pretty close. I can tell that I'm getting pretty close, but not perfect. I feel like I have to get some substrate in there and start working on the, like, the back behind here. Yeah.
Like I said, I use florin volcanit and I really like the rio oscuro color because I just like dark substrates. You might have situations where you want a more reddish substrate or whatever, but I like black. I like dark. Also, I chose the finest size that I could get, the extra fine, the f because I want that small, itty bitty substrate pebble just to make the whole scene look bigger in comparison. There's a few different ways of doing Planted Tank substrates. You can just go ahead and pour in the substrate or you can do it in a layered way.
A lot of the big fancy pants aquascapers do a layered system. They'll put a layer of this mineral powder and then they'll put a layer of this. That way it's supposed to extend its life because the plants will slowly leach the nutrients out of the soil, and it can make it last longer to do like a layered system. I hope I'm describing it well. I think that I'm going to do a little bit of a layered system, because what if I love this tank and I want to keep it for six years? You know, the first very small layer in my tank will be a little bit of laterite powder. It's like a very mineral rich, fine dust.
It is a little messy, though, so you have to be careful and put it down first and then cover it up with other things. I sprinkled the powder on the base of the tank. The plant roots will reach down and slurp it up. I have a mister and I sprayed it really gently afterwards, which is a great tip for dust control. Next, I added another mineral layer, this time in a larger particle size. I rinsed it really gently for some dust control, and I added it into the tank with a cup. And then I did an even bigger particle size. I should have a nice good base going on.
My laterite base layer is down. It looks nice. Now I'm going to go into this back corner and I'm going to fill that up with some substrate because I really can't work back there without some substrate to poke things into. Sort of. It's coming together. Now I have to do the hard part. I have to do this other half. I have to finish tonight.
This is going to be my next piece. get that out coooooold I've been working on this all night. I've been trying to mess around with it to get it back up to the amount that I liked it outside in the practice box. I think I'm close. I am so calling it a night, but tomorrow I'm going to start to adhere things together and get closer to actually calling it done and ready to get my plants.
It looks so cool backlit by that window. I think I'm finally happy with how it's arranged. I just need to keep moving forward. The next step is to take some super glue and adhesive that I'm going to use and actually fix all these branches and rocks into place. One thing you can do is you can use superglue method. All you need is some liquid cyanoacrylate, superglue, and a little bit of natural fiber. I learned this technique using cigaret filters. I got that from another aquascaper, so I got like a big ebay pack of cigaret filters.
But it turns out you can use any natural fiber you can use, like torn up cotton balls, paper towel, toilet paper, just whatever I think. So I tear it up, I shove it into nooks and crannies. I poke it in to contact points with a toothpick, and then I'll dribble some liquid super glue onto the fibers and it'll soak in and it will harden fairly quickly. You make a mistake and you get like a gel ish super glue, which I did. It just takes longer to dry, but the liquid stuff, that's fast. The Super Glue method is great and all. But to adhere larger things together, I decided to use my trusty two part epoxy putty method.
I go over this in detailed in this video where I sculpted fake rocks for a really lovely gecko enclosure that I made. I'm not going to repeat it here since this video is already too long as I'm editing it. I'm using this putty to really adhere to the larger sticks and branches together, and I'm also adhering the wood to the stone so that wood won't try to float when I fill the tank. The next thing that I need to do now before I start adhering like sticks to rocks and actually finishing the piece, is to take this handy dandy little yardstick. And I'm going to set it across the top and I'm going to mark where I need to cut a few more pieces so that way I can have a lid on here.
I live in a really dry climate. I need a lid. Otherwise water is going to be evaporating like crazy. It's going to be really annoying, as sad as it is to kind of get rid of this fun extra detail on the top of the tank. It needs to happen. I just don't think I'm going to be touching this beautiful, enormous piece of driftwood that I worked so hard to bring home from my convention. I'm not sure how I'm going to get this home I got this, I got this.
I don't think I'll be touching that one. It's a matter of pride. Since I have to sit around and just wait for a while, I figured maybe it would be a good time to open this mystery thing, this large mystery thing that I bought, like, a year and a half ago, and I haven't actually opened yet. It's still in its original wrap. I think having a bit of a backlight is going to be very cool on this take. So let's open it up and see what I got.
Huh? Huh. This is a background light from light ground that I special ordered just for this tank is the perfect size. So happy to finally be using it. Oh, snap. Is that cool or what? Maybe it's kind of hard to see what's going on because it's daylight and it's sort of backlit by that window.
But the effect is really, really neat. And this light ground panel also comes with some colors, some gradients that you can put on it. So I'm really excited about this. I'm happy with the arrangement. So now I'll cut the tops off my driftwood so I can fit that lid on. I use a hand saw outside for this. It works really well. It's a few days later now time has passed. All of this happened over like a week.
And that might seem confusing because I'm wearing the exact same shirt every time. I only have, like, a few shirts, guys. Give me a break. I know it doesn't seem like it's very different than it was a few days ago, but it is. Let me show you why. If you take a look around this tank, you may notice there are no longer zip ties holding pieces of wood together. That's because my epoxy clay has hardened. Now it's just holding everything together all nicely.
I shoved a bunch of rocks inside this root system, so it didn't look like things were just flying in the air for no reason. I wanted the roots of the tree to look like they were growing over some rocks. I used my epoxy clay to adhere all the wood pieces to themselves and to rocks. So that way, when I flood this tank, hopefully they won't be destroying my scape by floating up to the top. this rock pile in the back too I added more rocks and I used that epoxy clay to fill up some holes and you can't even really tell. I think it looks pretty good.
I went ahead and I placed my plumbing, but I haven't glued it in yet. I have a pump coming to me in the mail that I'm really excited about because it's pretty fancy. I still have to get my CO2 set up. It's like I still have a little bit of work to do before I can share this and it's really cool. Sump. Do you know what this means? I'm done with the hardscape. At least I'm telling myself I'm done. I'm telling myself that today is the very last day I can tinker with it.
Because I need to move on to plants. Planning plants, ordering plants, receiving them, and planting that. Once I get this many plants in, I'm going to have to spend like seriously all night planting this tank. But that's where you can usually find me in my evenings. Being a big nerd, the plant choice matters a lot. I want plants that give me a sense of scale in my tank. So I want fairly small plants, fairly petite plants to make the trees seem even bigger because I want my trees to feel enormous.
Its fangorn forest so my plants have to be tiny. I want moss. I want so much moss because fangorn forest is so dark and dense. And I just I feel like it's really wet and that there's a lot of moss growing everywhere. Why not? Let's plan out my tank to complete my fangorn forest aesthetic I'm going to focus on a whole lot of moss. Moss. I want it taking over the tree trunks and branches and creeping over the rocks.
I'll probably use something like Christmas moss or weeping moss in the foreground, something that can coat the trees. It can look wild and scraggly when it grows out, but neat and compact when trimmed. I could add a more petite, delicate variety peppered around for some interest and in the background, like fissidens riccardia or Mini pelia moss It isn't actually moss. It's actually liverwort. It's a really pretty option too, but something I've never tried.
The petite detail is just so nice though. Bucephalandra is a must in this tank. I wonder if I can find a variety that's darker or even reddish. I would pepper this over tree roots at the base of trunks, wherever it seems that a small, opportunistic plant could thrive. A medium sized anubias variety in the foreground and a smaller variety in the back could be a really nice way to get a sense of depth too. I feel like I want a not green plant for the foreground.
Or middle ground like a hygrophila pinnatifida, or one of these funky Lagenandra meboldii I have never seen one of these before. Maybe a crypt that can turn red or bronze. Ground cover plants in a moody, gloomy, mossy forest wouldn't be very large. I envision mostly small plants. Like, check out this really compact bacopa. Or maybe a crypt parva. I could do one of those Lobelia Cardinalis compacts.
Or maybe some Marselia hirsuta. I think that these would be some pretty promising ground plants, of course, surrounded by leaf litter, like in this reference image. I love this. Well, what do you guys think of my general plant selection ideas, good or bad? Have any other ideas or suggestions? Please feel free to leave those comments down below. I want to know. Well, I think that's it.
This was a big part of the project, too. Bringing in the hardscape and rearranging and adhering everything together took me a long time and figuring out what plants I want. Now I can do my order. I'll have to sit and wait for a while for that to get to me. And that's going to be my next video. I know maybe this wasn't super exciting, but the Fangorn Forest Tank is a lot of work and there's a lot of steps involved. So the next video on this is going to be awesome.
That's where I'll be planting my plants and doing my dry start method and trying out a few new techniques when it comes to dry starting aquatic plants. That will be fun. And then I'll get my sump set up and completed off. Flood it and I'll have my tank. Thanks so much for watching, guys, and for supporting me and enjoying my Lord of the Rings aqua scape. What do you think about my plant ideas and do you have any other suggestions for what might be really great to be in this tank? Thanks, guys.
Thanks for your support. Thanks so much to my really, really lovely handful of patrons who throw a dollar or two at me every single month. I love you guys. You really help me with supplies. So thank you. Have a great day and I'll see you next time.
We are excited to present to you the captivating video titled “Fangorn Forest Aquascape! Hardscape Transfer Walkthrough, Light Panels, and Plant Selection”. Get ready to embark on a journey of enjoyment, smiles, and laughter as you watch this delightful creation. “Fangorn Forest Aquascape! Hardscape Transfer Walkthrough, Light Panels, and Plant Selection” is a perfect blend of entertainment and amusement, carefully crafted to bring joy to your day. From the moment you press play, you’ll be greeted with a cascade of lighthearted moments, heartwarming scenes, and perhaps even a few surprises that will tickle your funny bone.
Whether you’re in need of a quick pick-me-up or simply looking for some light-hearted entertainment, “Fangorn Forest Aquascape! Hardscape Transfer Walkthrough, Light Panels, and Plant Selection” has you covered. The video promises to deliver a collection of moments that are bound to leave you grinning from ear to ear. With its engaging content and skillful presentation, “Fangorn Forest Aquascape! Hardscape Transfer Walkthrough, Light Panels, and Plant Selection” is more than just a video – it’s an experience designed to brighten your mood and spread positivity.
The creators of “Fangorn Forest Aquascape! Hardscape Transfer Walkthrough, Light Panels, and Plant Selection” have poured their creativity and dedication into crafting a visual treat that resonates with audiences of all ages. Through expert storytelling, impeccable timing, and an array of engaging content, “Fangorn Forest Aquascape! Hardscape Transfer Walkthrough, Light Panels, and Plant Selection” promises to be an unforgettable journey that lingers in your memory long after the video concludes.
So sit back, relax, and prepare to be entertained as you dive into the world of “Fangorn Forest Aquascape! Hardscape Transfer Walkthrough, Light Panels, and Plant Selection”. It’s a delightful video that aims to bring a dose of happiness to your day, leaving you with a lasting smile and a heart full of laughter.
This video was uploaded in youtube and has recieved 31996 views so far. This is a great achievement and laso it has received 1918 likes and .
Data bout the video:
Rating: ,
Video dimensions: 2d,
Video definition: hd,
Video duration: 00:17:10,
Video favourite count: 0
Video comment count: 303


